
Graphic card plays a important role in PC performance & Gaming environment. Well for the outmost gaming experience its recommended to go with the best graphic card option else you might face errors.
Well if you are a gaming freak then you might have noticed that few games actually do not need a graphic card to be installed but they can be played pretty well without installing any graphic card, so today I will be showing you how you can easily play all those games without any graphic card installed.
So we are going to use 3D-Analyzer, well you also heard about the swiftshader files that worked great, but now that method is too old and we have this amazing tool that can be used as the best graphic card emulator.
How It works...
So basically this tool simply utilizes your RAM as a graphic card memory, so suppose you have 2 GB installed as your RAM then it will access near about 256 MB as the graphic card memory and then keep rest as the normal RAM.
So this is a way that simply fakes the system in having a nice graphic card but its still running on single RAM. So now follow below steps on how this tool really works.
1. Download 3D-Analyzer Tool for Windows.
2. Now it's a .zip package so make sure to extract the package to get .exe file.
3.So now as you will open this tool you will see a big Select button, simply press that too choose your game file.
2. Now it's a .zip package so make sure to extract the package to get .exe file.
3.So now as you will open this tool you will see a big Select button, simply press that too choose your game file.

4. So make sure to navigate to the original game directory and select the .exe file of your game you wish to play.
5. Now after selecting that game make sure to tweak settings as mentioned below in the image, just select every setting like below.
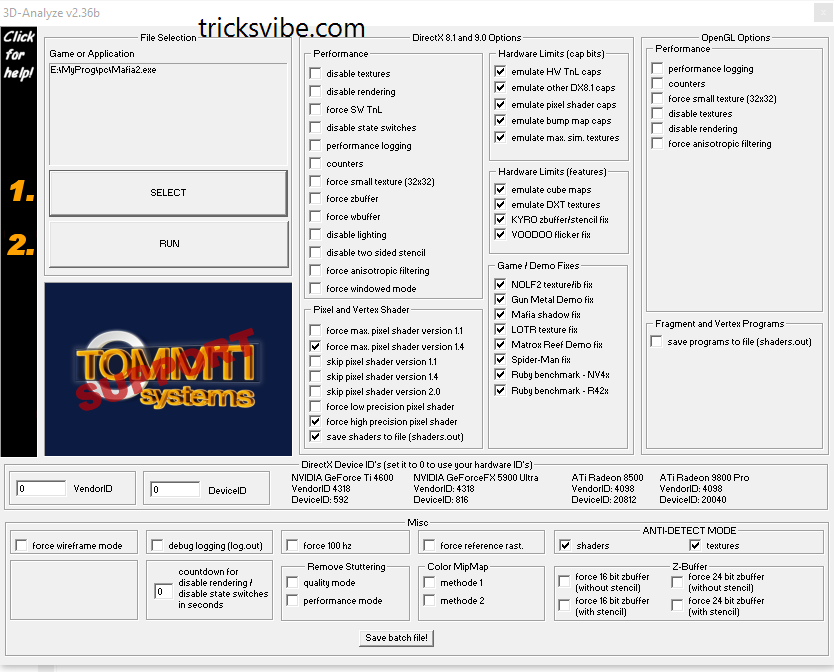
6. Now after configuring the whole software, just press "RUN" option and then just wait and see how your game runs automatically.
You can even save the batch settings for every single using the Save Batch File! option provided below in the tool.
So now every person who do not want to waste money on graphic card for a playing a single game, he can easily use this tool for making that game run pretty easily. Well but I surely recommend that if you are a gaming lover then you should have this tool for awesome gaming experience.
Its all done...!!
Enjoy....!!
Enjoy....!!
If You Want To Get Whatsapp Notifications Of All Stuffs Deals & Loots, directly in your Inbox.
Do, Subscribe for WhatsApp Alert & Get All New Updates Directly In Your Inbox.
Type "SUB TV" And Send It To "+918574847699" From Your WhatsApp.
Or You Can Also Go For Email Subscription From The Right Middle Part Of This Post.
Do, Subscribe for WhatsApp Alert & Get All New Updates Directly In Your Inbox.
Type "SUB TV" And Send It To "+918574847699" From Your WhatsApp.
Or You Can Also Go For Email Subscription From The Right Middle Part Of This Post.
Have A Awesome Day Ahead... :-)
Thanks!!!
Thanks!!!


