Monday, January 18, 2016

Android Emulator for MICROSOFT WINDOWS LINUX MAC OS (How to use android on pc)

Hi guys,

Whether nowadays we have an 80k phone or an 8k phone, still we need a android emulators on PC( LINUX, WINDOWS or MAC). So Today i am gonna tell you all of the emulators available in the market for any OS.


Common for all of them :

I. Softwares:
1. Genymotion

2. Install Android x86 (for kitkat android 4.4 x86 r2.iso is working only) in any virtual machine (like vmware, virtual box etc)

II: Cloud Services:
1. Appetize

2. Manymo


Only for MAC OS:

1. Xamarin Android Player

2. Andy

3. Droid4X


Only for LINUX OS:

No Individual Tools :(


Only for WINDOWS OS:

1. Windroye

2. Bluestack

3. Xamarin Android Player

4. Andy

5. AMIDuOS

6. Droid4X

7. YouWave

8. MEmu

9. Nox APP Player


Thanks for visiting.
Wish if it helped y'all.

Read more

How to install ADB+FASTBOOT in LINUX OS

Hello guys,

As we all know that the best OS for doing Development tasks is LINUX, so today i am gonna tell you guys to install "ADB+FASTBOOT" in LINUX with simply installing ".sh" scripts.


Steps:

1. Download this zip from here.

2. Extract it.

3. Open terminal emulator ( shortcut key: alt + ctrl + T )

4. Now just type the following command:

#sudo -i                                                  (then enter your passwod)
#cd "Directory where you extracted that zip" (eg: cd /home/username/Download/V1.Automatic-Adb+Fastboot_Linux_Installer/)
# ./Adb+Fastboot_Drivers_installer.sh

Done

Comment below if any problem........... Have a good time.... :)
Read more

How to enable "init.d" in MIUI ROMs(and phones too)

Hi guys,

Nowadays since network data is very important in everyone's life and the best way to save it from internal apps or updates is "firewall" like "droidwall, AFwal+ etc".
and to use these firewalls perfectly in MIUI ROMs, "init.d" file must be there(which is not in MIUI ROMs). So here are the steps for enabling or installing "init.d":

Method 1(easy and 99% working):

1. Download "init.d toggler" from google playstore or this link .

2. Open this app and press "enable init.d"


Method 2(complex for non linux users and 100% working but try it if method 1 failed for you):

1. Download this "term-init.sh" from here  written by "Ryuinferno @ XDA".

2. Open  terminal emultaor.

3. Now its for the fun things (typing commands):

#su   (grant root access when prompted)
#sh "loctaion of term-ini.sh"  (for eg: sh /storage/sdcard0/Downloads/term-init.sh)

4. The script will execute, now just follow the instructions showed.


Thanks for visiting.
Wish it helped you all.


Read more

How to install android sdk tools in ubuntu

Hello guys,

Today i am gonna tell you how to install android sdk in ubuntu.


steps:

1. Download android-sdk from official site

2. Now open terminal( shortcut key: alt+ctrl+T )

3. Extract the archive you just downloaded by typing command:

       #tar xvzf ~/android-sdk*.tgz

4. Now  get the root privileges for your account:

       #sudo su

5. Now install some Multi-Arch Packages:

     #apt-get install libstdc++6:i386 lib32z1 lib32ncurses5 libbz2-1.0

6. Now just relocate android sdk you just extracted:

     #chown -R root:root ~/android-sdk-linux*

     #chmod -R +xr ~/android-sdk-linux*

     #mv ~/android-sdk-linux* /opt/android-sdk-linux

7. Now install oracle-sun jdk:
  
    this is another tutorial,click here

8. Now inserting Android sdk tools into USER PATH:

       #su <username>

       #nano ~/.bashrc
     
       #export PATH=/opt/android-sdk-linux/tools:/opt/android-sdk-linux/platform-tools:$PATH

Note: Ctrl+Shift+v to Paste Content into nano
       Ctrl+x to Save and Exit
       Load New Settings by typing below written command:

       #bash                    

9. Now update android sdk tools and APIs:

       #cd /opt/android-sdk*/tools
       #sudo su -c "./android sdk"


Thanks for visiting.
Subscribe and follow me if you liked.
Read more

How to extract .img files in MICROSOFT windows


Hi Guys,


so today i m gonna show you "how to extract .img files in windows ".


requirements:


1. ext4 unpacker
2. ext2 explore
3. .img file u wanna extract ;)

steps:

1. open the ext4 unpacker.exe


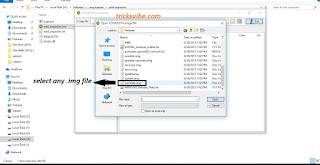
2. select the .img file u wanna extract


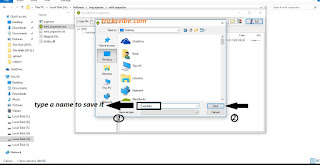
3. save the file


4. now open ext2 explore as administrator
5. now goto file>open image in it.
6. now just save the selected file in a new folder if u want to.


Read more

IMEI null ERROR in SAMSUNG Devices

Hi guys,


So today I am gonna tell you guys about "how to repair unknown baseband/no signal/imei null only for samsung phones".

First of all it is very essential to know about the reason why this occured:

1. Upgrading your software update manually.

2. Flashing custom ROMs(some also flash custom kernel thats why).

3. Flashing custom kernels.

These are the reasons i have the most of time for this error.


So my suggestions to newbies are "precaution is better than cure always", always make a NANDroid backup before any flashing or upgrading.

As we all know that information related to "IMEI, MAC address of NICs, Vendor IDs etc". In MTK these are very easy to find and playwith but in samsung dont even try for it if you are a newbie because they ahve hidden it very well under EFS i.e, a system directory.

After alot of study and research I found out a solution ( if you have a NAND backup or not ) using a tool developed by an XDA member "LiquidPerfection", namely "EFS Professional".


Steps :

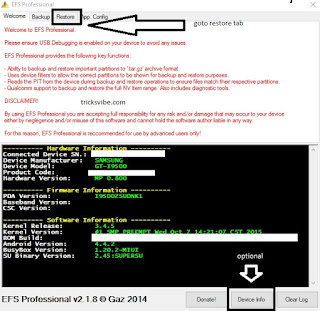
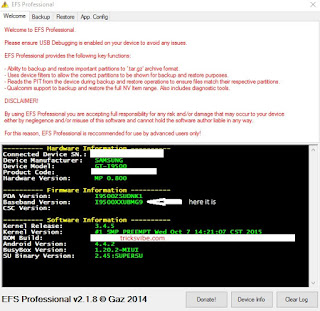
1. Download EFS professional.zip from here, extract it, open EFS professional.exe and click on "EFS professional".


2. Connect your device and click on Device info if you wanna see details of your phone(optional).


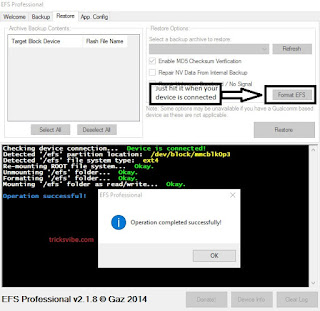
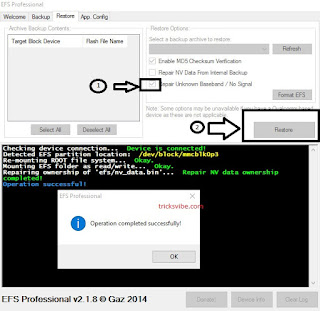
3. Now goto Restore tab and click format EFS and press OK (sometimes your EFS gets corrupted so just format EFS option can make it well) and reboot ( press *#06# and check if u got you imei back).


4. If still you got no success, then tick the option "repair unknown baseband/no signal" and then click on "restore".


5. Done now just goto settings or engineer mode or USSDs you have got your IMEI, MAC, IDs back.


Thanks for visiting guys.
I wish it helped you all.

#IMEI null
#broadband unavailable
#how to restore imei
#NVRAM error

Read more

Friday, January 01, 2016

Unable to delete files from internal storage (how to get write access to a write protected internal storage)


Hi guys,

Today I am gonna tell you guys "how to get write access to a write protected internal storage".
So, usually whenever we RESTORE our NANDROID backup, this problem occcurs and if you have a phone with a high internal storage and you haven't bought a memory card because of this, then this post is just for you.

In this case, "chmod" won't help because this is problem done by our phone's recovery(CWMR, TWRP and PHILZ).
When we restore our nandroid backup, these recoveries make that whole internal storage drive "write protected"
and don't make it normal and because of this you can't write anything on that storage(like deleting, moving, copying etc, renaming is possible though ;) ).

So for a perfect and forever(till you restore again) solution of this follow the following steps:

1. Connect your phone to PC as MTP device or USB storage.

2. Copy all  of the data from the drive you want to solve the issue with.

3.a. Now if your device connects as USB storage than just format as usual.

b. but real problem is when you have connected as MTP device then there will be no format option anywhere.but don't worry its very easy to do because your phone is already rooted :).It can be done by two mehtods:

(i): Using terminal emulator in your phone and type these commands:

# su                              -->  to get the root access
# cd ~                           -->  to get to the "/"(root) directory
# cd storage                  -->  to get to the "/storage/" directory
# rm -rf sdcrd0/            -->  to delete the data in sdcard0(internal storage of your phone)
note: if you can't find any of these folders then try to use "ls" command and get the exact name and type it as it is(because adroid is linux based and linux is case sensitive).

(ii): Using adb to get shell(using "adb shell") and type the same commands in above step.


4. now just copy your material back and now they all are r/w.


Read more