Showing posts with label how to. Show all posts

Saturday, July 23, 2016

How To Remove SHORTCUT VIRUS From Your Pendrive or MICROSOFT Windows Pc


Hello Friends...
"How to remove shortcut virus" is a important  Question which comes in the mind of almost Windows PC users.
I also faced this situation when I had no option to remove shortcut virus from pendrive and PC , then I searched about it on many websites and found amazing solutions that worked like charm. Today I am going to share with you how can you remove shortcut virus easily from your windows PC, pendrive and laptop.

How Remove SHORCUT Virus using CMD [METHOD 1]:

1.Insert your Pendrive in PC.
2.Open Start Menu-> Run. (Alternatively, Win + R key combination). In the run dialog box, type cmd.
Copy the below code and paste it into CMD:
​ATTRIB -H -R -S /S /D G:*.*


Note
You’ll need to change the G letter of the code to your Pen Drive’s letter. G was just an assumption (for the above example.)

Meaning of the above code:

❇Attrib specifies the attribute.
❇-H is to unhide all the files on Flash Drive (which were hidden as shortcuts due to the virus)
❇-R is to create the files in your Pen Drive (recreate the shortcut files retrieving the original contents)
❇-S makes all the file on your USB drive not to be the part of system again (which makes it easy to do the process)
❇G is the Assumed USB Drive’s Letter (you’ll have to change it according to your Pen Drive / External HDD drive’s letter).

A Coded .bat File to Permanently Remove Virus[METHOD 2]:


A bat file is an executable file which contains some pre-written script.

Just like the VBScript, it is made to do certain tasks, and in our case, it’s removing the shortcut virus.​
•Open Notepad from your computer/laptop.
•Type or copy the below code as it is on notepad.
@echo off

attrib -h -s -r -a /s /d Drive:*.*

@echo complete
•Make sure to replace Drive with your drive name. Eg: F:*.*
•Now click on Save As… by clicking on File tab in notepad and change the save as type to “All files(*.*)” from “Text documents” and rename it to removeshortcutvirus.bat and save it on your desktop.
•Now close notepad and go to desktop and double click on the BAT file that you have just created.
•All shortcut viruses from the respective drive will now be removed in couple of seconds and your original files will be back.
Enjoy

If You are to lazy for trying  above method then here is a list of some tool which is really helpful for removing shortcut virus from your pc, laptop and USB Drive.
1. USB FIX
2. SHORTCUT VIRUS REMOVER
3. R KILL
4. ROUGH KILLER

Post Completed!!!!


If You Want To Get Whatsapp Notifications Of All Stuffs Deals & Loots, directly in your Inbox.
Do, Subscribe for WhatsApp Alert & Get All New Updates Directly In Your Inbox.
Type "SUB TV" And Send It To "+918574847699" From Your WhatsApp.

Read more

Thursday, May 05, 2016

How To Use Whatsapp Without Phone Number

Instant messaging service WhatsApp has become the part of our lives. But do you know you can also use this service without having to give your phone number?
Try these steps and you should be able to use WhatsApp without phone number.
1. At first uninstall WhatsApp on your phone.
2.Now again download and reinstall WhatsApp on your mobile phone.
3.Keep your phone on flight mode so that all the messaging services are blocked/stopped on it.
4.Now put any number you like on your reinstalled WhatsApp. This will let WhatsApp accept your number but it won't be able to send any message to you for verification
5.However, without verification, user will not be allowed to use WhatsApp. So WhatsApp will ask for an alternate process. Click for 'Verify through SMS'. Here you can give your email id.
6. Now click the set button and immediately click the cancel button. This will stop the authorisation process.
7. Now install the 'Spoof text message'app.
8. Now, fill in the details when you complete the above mentioned process
TO: +447900347295
From: + (country code) (mobile number)
Message: Your email id
9.Now your details will be sent to this number and you will be able to use WhatsApp without your phone number

All done.  Now you are able to use Whatsapp without phone number. 

Thanks for visiting, Have a good day ahead. 
Read more

Monday, April 25, 2016

How to Increase blog traffic using Google plus

Hello Friends..
Today i am going to talk about "How to Increase blog traffic using Google plus".
There are many blogger's written post for blog regularly but not giving importance to sharing .  Few days back im also not giving so much importance to sharing but once i shared my post to G+ community and get huge response in back, so im here to share my experience with all of you.

How To Increase Blog Traffic Using Google plus

Which steps im going to tell here,if you will take them seriously then  25% of your blog traffic will come from Google plus .

Share  image with Post link🔗

When we writes a article and publish it on blog then a option will come for share same post with Google plus .
What we have to Do-

  • Firstly We have to write title of the post .
  • Now attach your Url of post which you want to share .
  • In last attach a image which is related to your post.


Appropriate  Audience ðŸ‘¥

Normally Most of us make a mistake when it comes to sharing, we did not select aome proper circle. We are just share our post with people,No matter which type of circle or people . So now when we are gping to share a post with people ,firstly we have to choose a proper circle and audience for that. They all will get a push notification and surely comes to visit you .

Send Email📧

When we are sharing our post there is also a option 'Also send email from you to circle'.
Use this option for sending a email alert⚠ to user.
Now attach your Url of post which you want to share .
In last attach a image which is related to your post.


Send Email Alerts📧

When we are sharing our post there is also a option 'Also send email from you to circle'. Use this option to send a email alert from you.

Communicate With Others

Be active with others. There's possibility of gaining more visitors  because when you are giving response to people ,then also want to interact with yoi as well as visit your articles .

This is my Experience with Google plus, At least  you all have to try these little things.
Have a good day ahead .
Thanks .
Comment below. If you want to say something .

If You Want To Get Whatsapp Notifications Of All Stuffs Deals & Loots, directly in your Inbox.
Do, Subscribe for WhatsApp Alert & Get All New Updates Directly In Your Inbox.
Type "SUB TV" And Send It To "+918574847699" From Your WhatsApp.


Read more

Saturday, March 12, 2016

How To Create Android App For Any Blog/Website?


Hello Readers...

Today I'm gonna talk about making an Android app for a Personal Website or Blog.
As you all know that Android is the fastest
growing Operating system  at this time.
How can you provide an android app for your Blog Reader.This way, they can keep track of blog updates from their Android Smartphones and Devices.
There are many websites which is providing Android App for Your website.
Currently we discuss about two method...

#1st Method>> 

We all know that WordPress is first choice of all bloggers. Creating an app for WordPress blog is not difficult, So let's see how can we create an app for WordPress blog...

•Go to Feed.nu Website and create/register for an account
•Now Login with your account and enter your Feed settings.
•Then Go to Feed.nu WordPress plugin page and download it.
•Install the Plugin and then activate it from the WordPress dashboard.
•Now, In your WordPress dashboard, click on Android and then select your Android App Language, Appearance and then hit the Generate APK.
That's it.  Your Android App is ready for use.
You can use this app to your device as well as submit this app to Android market.
Note- you can also use feed.nu for other platforms like blogger,  we will discuss about it later.

#2nd Method>>

This method is work for all type of website and blog. No matter which platform you using for your blog(i.e. WordPress,Blogger).
There is an app called ApkCreator Web2App, which is easily build and create a customized Android app feom web content & without using any typical coding. This is the best solution at right place for everyone.

HOW IT WORKS:-

You will need a website that will be template of the app.
Now insert the parameters which is needed for your App. 

After that ApkCreator will create a apk file in few seconds.
There is also a pro version of this app is available, You can use it if you afford it :-P

Feature of app as mentioned on PlayStore-

#Website to android app converter
#Built-in easy android application web view creator
#5+ basic main app features
#Offline mode using cache data
#Monetize your app with an Ad mob banner
#Send push notification to your app users through Parse
#Cool custom splash screen effect for your app
#Orientation and browser manager
#Status bar and zoom control manager
#Cache data and App2sd manager
#Package name manager
#Uses-Permissions manager
#Option menu tabs and About dialog manager
#More than 5+ language supported
#No advertisement
#Desktop version available
#More feature available to discover inside the app

Do Like, Follow, Subcribe and comment if you have any query and suggetion.

Thanx for reading this post.

Have a great time a head.
Read more

Thursday, March 10, 2016

How To Increase RAM In MICROSOFT Windows Using Pen Drive

Hello Readers!!
Most of us knows that RAM is known as RANDOM ACCESS MEMORY. It is the main memory of device which executes all process and perform every task.
So basically, More our device has Ram, more increase in speed of run time.
If we run Number of tasks at the same time then you may be face not responding problem Because Ram doesn't meet the requirements of application. In that case you have to increase you Ram.
Its not possible for everyone to upgrade High Grade Ram. So the only best possible way for them is to use Pendrive as Ram.
This is a good feature of Windows that allows to increase your Virtual Memory using Pendrive. This virtual memory doesn't have same performance as compare to actual ram device. But this concept increase your paging memory and some other functioning which means your overall performance became good and some application runs smoothly without lagging.
So follow below guideline carefully for using your pen drive as ram.
HOW TO USE PEN DRIVE AS RAM IN WINDOWS--
1.First of all insert your pen drive.
2.Then open My Computer and right click >> Then open Properties.
3.Now Properties window will appear, then click on Advanced system settings from left side.
4.Then in Advanced tab click on Settings button appear in Performance tab.
5.Again new window will appear then click on Advanced tab.
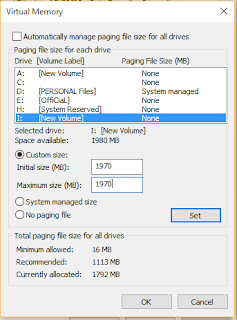
6.In advanced tab there is an option of Virtual Memory box, then click on Change Button.
After click change button “Virtual settings” will appear.


  • Now unchecked the box of  “Automatically Manage Page Size Feature”.
  • Then in custom  size add your Pen drive current same in below format
  • Now add same “Value” in both boxes and click on apply button.

  • Restart your PC or Laptop and now pen drive will work as “Virtual Ram”.


Remember..
Always safely eject your Pendrive. Direct removal may leads to device damage.
In Virtual Memory method, If you want to convert back your Pendrive into Normal. Then again open Virtual Settings and remove custom memory value and choose Default settings by checking “Automatically Manage Paging Size”.
.Always add 10 mb less from current available size,It is better for device safety.  
Comment down if you face any problem!

Thanks For Visiting.

If You Want To Get Whatsapp Notifications Of All Stuffs  Deals & Loots, directly in your Inbox.
Do, Subscribe for WhatsApp Alert & Get All New Updates Directly In Your Inbox.
Type "SUB TV" And Send It To "+918574847699" From Your WhatsApp.

Or You Can Also Go For Email Subscription From The Right Middle Part Of This Post.

Have A Awesome Day Ahead... 🙌
Read more